To anyone who is planning on skipping the DJ but wants an upgrade from a Spotify playlist, keep reading because I'll be explaining how to build a playlist using some tips and tricks I've picked up from working in the live theatre industry.
For those who want a full proper set-up, you'll want to rent your equipment for the day-of and preferably a couple days before so your DJ relative can test the system out. You can rent what you need from music stores like Long and McQuade. They can be more specific with the details you'll need for your specific expectations, but the gist of what you'll be renting will include:
- 1-2 speakers. 2 is best for stereo sound.
- a 5 channel mixing board with midi cables for the speakers, and auxiliary for your laptop
- a microphone if you plan on doing speeches (a wireless one will come with a receiver box)
- a power bar if you don't already have one
If you'd rather avoid the rental fees, you can easily get away with your laptop and a BOSE/other good quality speaker if you're not in a large room with bad acoustics. Please ask your venue about their options/previous experiences since they'll know more about the space than anyone else.
Now to the fun part: making your playlist! There are software programs available online that tend to have fancier options than iTunes or Windows Media Player. In the industry, we tend to use SFX (for windows) or QLab (for IOS). For this tutorial, I'll be using QLab, but SFX's set-up is very similar in design. When you download, choose demo mode and open a new workspace. It should look like this:
QLab blank workspace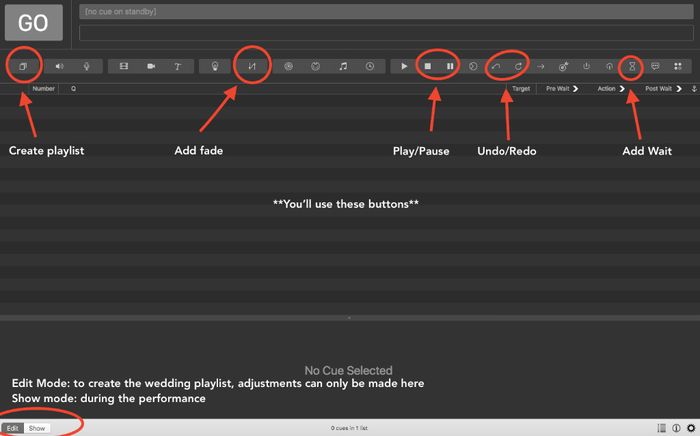
The buttons highlighted above will be the only ones you'll need to use to set up your playlist. Make sure it is on edit mode in order to make your changes. You only need to put it on show mode on your big day.
Step 1: add music
Next, you'll need to add your music file in. It's just a simple drag-and-drop like this:
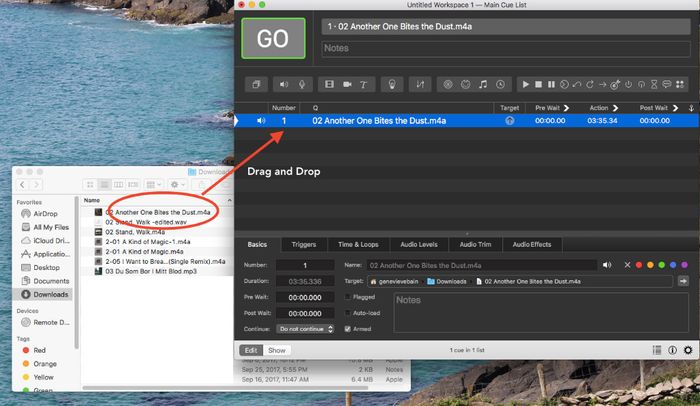
So if I want to use some Queen, I opened finder (or start for windows) and went to the folder my music is saved in. Drag it on and plop it in. Step one complete!
Step 2: Fades, Stops and Pauses
Next, you'll want to add fades. They make the song drift in or drift out rather than stopping and starting. You'll click the fade button or the Stop/pause button depending on what you want the song to do. I always recommend fade because it sounds nicer. Click one of those two buttons we first saw and it will look like this:
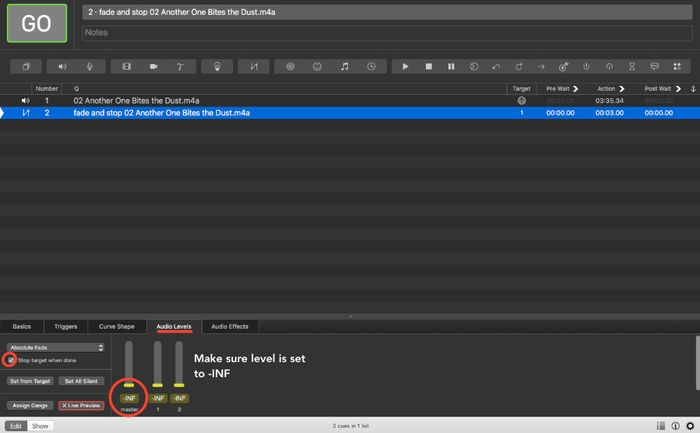
Go to the Audio Levels tab and check off 'stop target'. It makes sure the song doesn't keep playing after you fade. Then activate the sound level to -INF to make sure the sound fades completely out. Then when the song is playing, when you hit GO for the fade, it fades the song out gently to nothing. Voila!
Now comes the tricky part.
Beside the Audio Level tab you're in, click the 'Basics' tab. It will look like this:
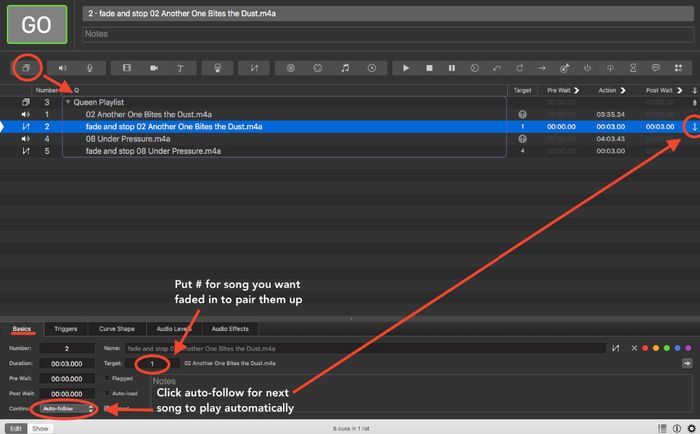
In the Target section, put the number the song was assigned to pair the fade with the song. In this case, Another One Bites the Dust is assigned #1 so to fade that song, I assign target 1.
Step 4: auto-follow
Under Basics still where it says 'continue', change it from do-not-follow to auto-follow. When you do this, the next song will play the millisecond the fade is over so there's no gaps! One you click that, a little arrow do-dad should show up next to it in the list. If you put an auto-follow on every song, it will play through the whole list undisturbed.
Expert Level
Step 5: organizing playlists
If you found this super easy and want it to look like a playlist, click the first button in the list called the playlist button. It is what creates the shadow box that all my cues (songs and fades) are in up above. Once you've made and named it, drag all your cues into it in the order you want them in! Make sure to double-check all your auto-follows are on and all your fades are assigned!
Ta-da you're done!
On the day of, it will all be organized and all you'll have to do is make sure there's someone there to hit spacebar or GO at the perfect moment! Switch it to show mode so your DJ can't mess up your lovely work and you're good to go!
Show mode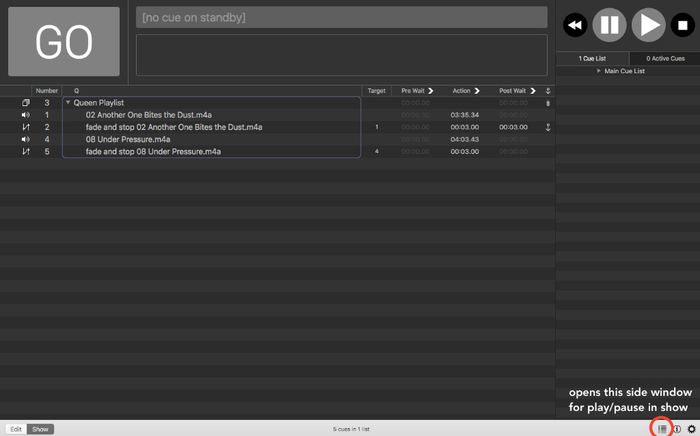
If you'd rather have each song play with no fades and be able to fade the whole playlist, add the fade to the end and assign it the number attached to the playlist. in this case, my Queen playlist is #3 so I would assign the fade to 3. When I hit GO, it will fade and stop the whole playlist. NOTE: don't do this to pause, this is only to stop all the music before restarting.
If you want to pause say to make an important short announcement, fade manually on that mixer board I recommended you rent using the sound lever on the bottom, pause it on the side bar in the program, then hit play and manually push the slider back up for uninterrupted music enjoyment.
If you want to crossfade one song with another and get really fancy, QLab gives step-by-step instructions on how to do that as well as other options too.
If you have any questions, both software programs have a troubleshooting guide to get you through any issues you may be having. They also have online forums for questions and answers and to address typical FAQs. Otherwise, hit up your friendly neighbourhood theatre technician!


